
Open a Deposit Screen
1. Click on the ‘Banking’ tab in the Form Selection toolbar on the far left side of the screen to invoke the Banking screen as shown below.
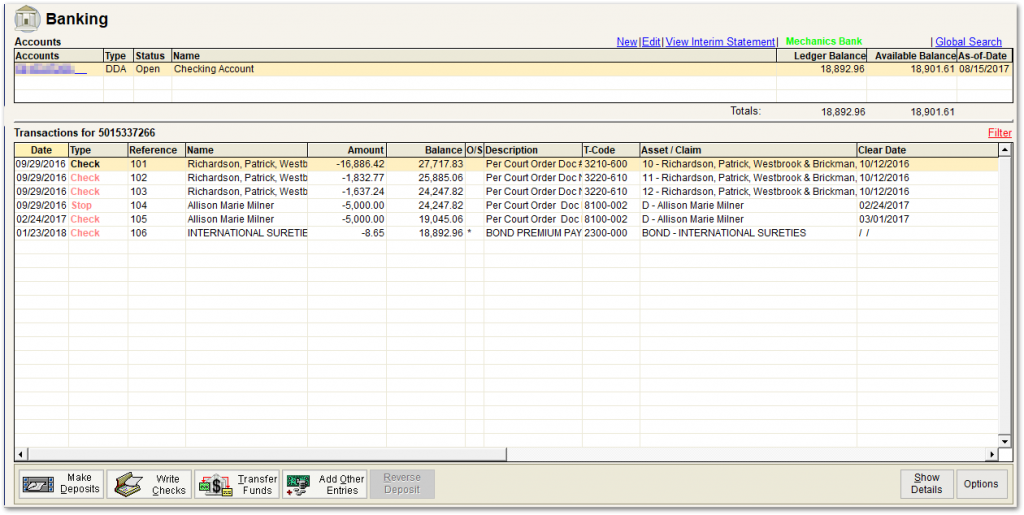
2. To view existing Deposit Information, single click on the appropriate transaction in the grid and click on the ‘Make Deposits’ button shown at the bottom left of the screen above, which invokes the Deposit Details screen shown below.

Deposit Information Fields in the Grid
The following fields are on the Deposit Details screen:
• Deposit # – a non-editable feature. This is the deposit counter incremented automatically each time the user adds a new deposit to the ledger. The first six numbers are shared by transactions that are on a single deposit ticket. The last number is a unique suffix to identify the individual item.
• Date – The ‘Date’ field will default to today’s date. Once the Deposit has been saved, the ‘Date’ field will no longer be editable. (Note: The transaction date that will appear on your bank statement will always represent the date that the transaction was processed by the bank.)
• Receipt – This button allows you to link a deposit to an entry in the Receipts Log. See the Receipts Log (generated via the Form Selection toolbar on the far left side of the screen by selecting the ‘Banking’ tab and then the ‘Receipts Log’ link under the Banking sub-menu), for more information.
• Check # – Enter the Check Number of the check you are depositing. This information will print on the Deposit Ticket.
• Amount – Enter the amount of the deposit.
• Name & Address – the name and address of the entity (payor) that appears on the check that is being deposited. The address fields are not required while payor (or ‘Name’) is a required field. Name and address can also be added via either:
• The Repetitive Payee List. Using the Repetitive Payee List enables users to track payment histories from the same payee. This is important for generating reports and tracking payees such as Accounts Receivable payees. Click on the Ellipsis button, ![]() , located next to the ‘Name’ field, which invokes the Repetitive Payee List screen shown below. Select an item from the grid and click on ‘Select’, which will auto-populate the Name and Address in the Deposit Details screen.
, located next to the ‘Name’ field, which invokes the Repetitive Payee List screen shown below. Select an item from the grid and click on ‘Select’, which will auto-populate the Name and Address in the Deposit Details screen.

-OR-
• Right clicking, or using the drop-down list, in the ‘Name’ field to select from the list of Repetitive Payees/Payors. This selection list (shown below) also contains a ‘Search for’ box to find items more easily. Select an item from the grid and click on ‘Select’, which will auto-populate the Name and Address in the Deposit Details screen. Check the ‘Include Claimants’ box to also see the creditors listed in the current case.

• Show under ‘Payments to Debtor(s)” (TFR): Check this box to display this transaction value in section 4 in the summary on the TFR. An example is the non-estate portion of the debtor’s tax refund.
• Show under “Other Payments to Creditor” (TFR): Check this box to display this transaction value in section 4 in the summary on the TFR. An example would be a compromise payment made outside of a traditional all claim distribution.
• Description – The memo or description of the transaction entered by the user and displayed on the ledger list view as well as the Form 2 description column.
Every transaction should be completed with a detailed description of the transaction. For deposits, descriptions that include the order date and details of the sale are important. The description entered displays on UST Form 2.
You can use codes (macros) for Repetitive Ledger Descriptions you previously set up by using the screen (shown below) invoked when selecting ‘Tables’ > ‘Ledger Descriptions’ from the top Main Menu toolbar (File Menu).

Note: Descriptions can also be added or modified directly from the ledger. Simply double click on the description cell of the transaction to make your changes. Your changes will be saved automatically.
• To Use a Description Code:
• Select ‘Ctrl+Spacebar’ to expand it.
-OR-
• Right click, or use the drop-down list, in the ‘Name’ field to select from the list of Repetitive Payees/Payors, as shown and described above.
Use the drop-down arrow on the ‘Description’ field to select from a predetermined list of frequently used ledger descriptions. This selection list (shown below) also contains a ‘Search for’ box to find items more easily.

The description defaults can be added/edited using the Ledger Description List shown two screenshots above.
• Asset # – To tie the deposit to an Asset, click on the ‘Asset # ‘drop-down list. The ‘Asset #’ drop-down list displays the net remaining value of the asset along with the asset description and number. Note: If the selected Asset # has a category associated with it, the category of the Deposit will be automatically updated with the category.
• Asset Name – The name of the asset will show to the right of the asset number.
• FA (Fully Administered) – Click on this box if the asset is Fully Administered, whether or not there is a Remaining Value. Trustee Suite will automatically calculate the System Adjustment amount to bring the Remaining Value of the asset to zero. This will generate an “FA” in Column 6 of Form 1 (Asset Fully Administered/Value of Remaining Assets).
• Category – The Category drop-down list displays all of the “Income” UTC codes. It is required that a category is selected prior to saving your transaction. The category that you select will directly affect where the transaction will appear on the U.S. Trustee Form 4. If you have tied an asset to the deposit that has a category, the category for the asset will automatically be populated into the ‘Category’ field. If the user chooses a UTC (category) that does not match the asset, the user will be prompted with a warning indicating that the asset UTC and the deposit UTC do not match.
To enter a Ledger Category, either:
• Click on the ‘Combo’ box down-arrow to select from the Category List.
-OR-
• Type in the code and exit the field.
• Assistants – The ‘Assistants’ button, which invokes the screen shown below, is used with Deposits when the transaction needs to be split across multiple assets, is a refund from a creditor or is a net amount from a gross transaction handled by a third party.

Complex checks and deposits that require more detail generally fall into one of three categories, as shown above):
• Refunds – The creditor returned the funds. This is not new estate money and needs to be associated back to the origin claim.
• Splits – The deposit is for more than one asset, and the user needs to properly allocate the collection of funds to each asset.
• Distributions – The amount of the total transaction cannot be deposited, as it was handled by a third party. This is common with real estate transactions and auction sales.
The ‘Assistants’ button was created to handle these types of transactions. It can be used when entering a check or deposit and can also be used for bank-originated deposit adjustments or disbursement adjustments. Any transaction using the ‘Assistants’ button will incorporate the primary transaction as well as the complex transactions entered in the additional screens. For more information on the ‘Assistants’ button, see the ‘Complex Transactions – Assistants’ button.
• Print Deposit – This checkbox defaults to ‘selected’ (checked).
• Printed/Not Printed – After saving a Deposit, the words “Not Printed” will be displayed. When you print the Deposit Ticket, you will be asked if it printed correctly. Answering ‘Yes’ to that question will invoke the word “Printed” next to the ‘Print Deposit’ checkbox. Answering ‘No’ will keep the display of the words “Not Printed”.
• Comment – Enter a comment, if desired. This is an “internal”, non-printing memo. Repetitive Ledger Descriptions may also be used in the ‘Comments’ field.
To use a Description Code, and invoke the Select a Ledger Desciption to Insert screen shown below, either:
• Type the code and select ‘Ctrl+Spacebar’ to expand it.
-OR-
• Use the drop-down arrow on the ‘Description’ field to select from the list of Ledger Descriptions. The selection list also contains a ‘Search for’ box to find items more easily.

• Unclaimed Funds – Check this box to enable the Unclaimed Funds wildcard. This will display the wildcard value in the T-Code when printing your Form 2.
• Non-Compensable – Check this box to enable the Non-Compensable wildcard. This will display the wildcard value in the T-Code when printing your Form 2.
• Entered By, Entered On, Approved By – These fields will display the name of the person that entered the Deposit, on what date and who approved the transaction, respectively. If you have Approval rights in Security (from the top Main Menu toolbar (File Menu), select ‘File’ > ‘Security’, which invokes the Security Information screen, then select the ‘User Rights (page 1)’ tab, and the ‘Approval’ checkbox will be selected under Communication at the far bottom right of the screen), your user name will appear under ‘Approved By’ in the Deposit Detail screen when you enter an item.
• Status – The ‘Status’ field is located above the ‘Save’ button in the Deposit Detail screen. A Deposit can be Pending, Approved or Sent. A Deposit is automatically marked as ‘Pending‘ or ‘Approved‘, depending on your security rights. Once transmitted, it becomes ‘Sent‘, and select fields can no longer be modified.
Note: Once a Deposit has been transmitted, you cannot return it to ‘Pending‘ status.
Buttons at the bottom of the Deposit Details screen:
• Save – Click on ‘Save’ to save your transaction.
• New – Click on ‘New’ to create another transaction. It will open a new Deposit Detail screen with the next deposit number.
• Cancel – Click on ‘Cancel’ to cancel all changes and close the active window.
• Options – The ‘Options’ button is located at the bottom of the Deposit Detail screen and provides additional controls for the deposit. It has three menu items:
• Lock Transaction:
• Click on the ‘Lock Transaction’ menu item to Lock the transaction from editing. You will see a checkmark to the left of the menu item. You will then see a ‘lock’ icon on the bottom left corner of the Deposit Details screen.
• You may Unlock the transaction by clicking on ‘Lock Transaction’ again. Click on ‘Save’.
• Approve Transaction:
• Clicking on ‘Approve Transaction’ will change the Status from ‘Pending’ to ‘Approved’.
• Refresh Lists:
• If you have edited or added items to the Repetitive Payee List from the Ellipsis button, ![]() , as shown above in the third screenshot from the top of the page, click on ‘Refresh Lists’ to update the Repetitive Payee List without closing the active window. While in a Transaction Information screen (in this case, the Deposit Details screen), ensure the drop-down list that needs to be updated has been closed.
, as shown above in the third screenshot from the top of the page, click on ‘Refresh Lists’ to update the Repetitive Payee List without closing the active window. While in a Transaction Information screen (in this case, the Deposit Details screen), ensure the drop-down list that needs to be updated has been closed.
• Replicate – The ‘Replicate’ button enables the user to recreate a prior transaction. The date will change with the new transaction, and the editable fields can be altered prior to Save. This option is popular for estates that collect frequent recurring payments from the same payee. Save time by using the ‘Replicate’ button to create a new deposit using the same information from an existing deposit.
• Close – Click on the ‘Close’ button to close the Deposit window.