
At the Adjustment Information page, you can enter Deposit and Disbursement adjustments as well as Ledger Memos.
Create a New Adjustment (Add Other Entries)
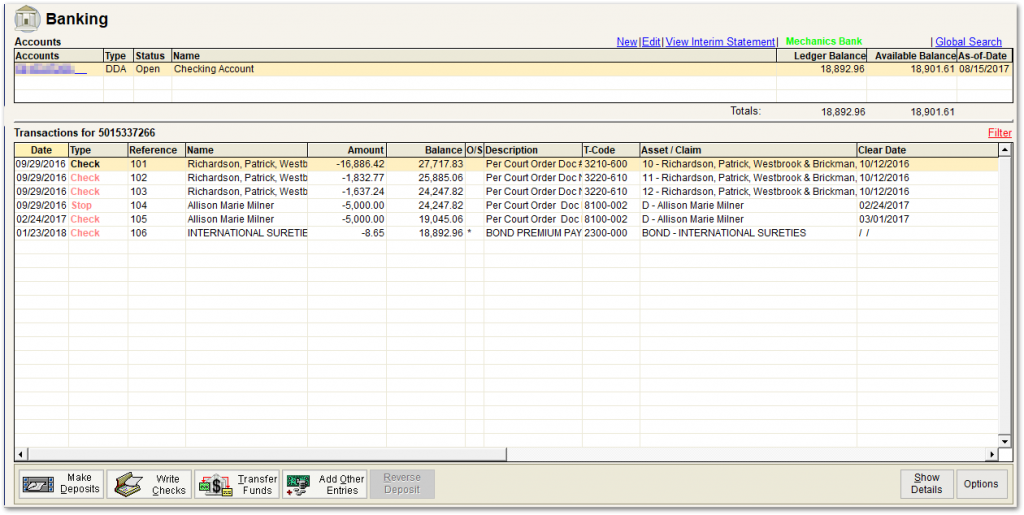
1. Click on the ‘Banking’ tab from the Form Selection toolbar on the far left side of the screen, which reveals the Banking screen as shown below.
2. Select the correct account by single clicking on it from the grid on the Ledger (Banking) screen.
3. Click on the ‘Add Other Entries’ button on the bottom of the Banking screen.
The Select Entry Type screen (shown below) will be displayed with the following options:

Deposit Column:
- Increase (Deposit Adjustment (DPA)): The Receipts column of Form 2 (which includes deposits and interest) will be increased, as will the Ledger Balance.
- Decrease (Deposit Reversal (DPR)): The Receipts column of Form 2 (which includes deposits and interest) will be decreased, as will the Ledger Balance.
Disbursements Column:
- Increase – Funds Out (Debit Adjustment (ADD)): The Disbursements column of Form 2 (which includes checks) will be increased, while the Ledger Balance will be decreased.
- Decrease – Funds In (Credit Adjustment ADC)): The Disbursements column of Form 2 (which includes checks) will be decreased, while the Ledger Balance will be increased.
Interest Earned:
- Increase (Interest Credit INC)): The Receipts column of Form 2 (which includes deposits and interest) will be increased, as will the Ledger Balance and the Interest Earned on the case.
- Decrease (Interest Debit) (IND)): The Receipts column of Form 2 (which includes deposits and interest) will be decreased, as will the Ledger Balance and Interest Earned on the case.
Initiate Wire Transfer:
- Increase (Wire Transfer Credit (DPA)): The Receipts column of Form 2 (which includes deposits and interest) will be increased, as will the Ledger Balance.
- Decrease (Wire Transfer Debit (ADD)): The Disbursements column of Form 2 (which includes checks) will be increased, while the Ledger Balance will be decreased.
Official Bank Check:
- Decrease (Official Bank Check (ADD)): The Disbursements column of Form 2 (which includes checks) will be increased, while the Ledger Balance will be decreased.
Memo Transactions:
- Increase (Deposit Memo (MEA)): A positive value will be printed in the Transaction Description column of Form 2 but the total of the column and the Ledger Balance will be unaffected.
1. Select the type of adjustment you want to create, then click on ‘OK’.
2. Enter adjustment information into the Adjustment Information screen and click on ‘Save’.
- Decrease (Disbursement Memo (MER)): A negative value will be printed in the Transaction Description column of Form 2 but the total of the column and the Ledger Balance will be unaffected.
1. Select the type of adjustment you want to create, then click on ‘OK’.
2. Enter adjustment information into the Adjustment Information screen and click on ‘Save’.
Note: Use a Memo Increase only to add “note” entries to banking. These are rarely used.
After you make your adjustments, click on ‘OK’, which will invoke the Deport Adjustment Information screen as shown below.

Adjustment Information Fields:
The Adjustment Information screen (shown above) and the fields available will vary depending on the adjustment you select from the Select Entry Type window.
Adjustment Number – The Adjustment Number (Adjust. #) is automatically entered by Trustee Suite for internal use.
Date – The Date field will default to today’s date, but you can post- or pre-date an Adjustment or Memo if you wish.
Amount – Enter the amount of the Adjustment or Memo.
Gross Sale/Asset Sale – These functions will be found on the Deposit Adjustment and Deposit Reversal pages, and are used the same way as described in the Add Deposits Adjustments page of this help file.
Name & Address – Enter the name and address of the Payee or Payor. Use codes (macros) or Repetitive Payees/Payors, which you previously set up in the Tables menu on the top Main Menu toolbar (File Menu). For instructions on how to add or modify the Repetitive Payee List, please see the “Repetitive Payees Table” (from the top Main Menu toolbar (File Menu), select ‘Tables’ > ‘Repetitive Payees’.)

There are three ways to select a Repetitive Payee Code:
• Type the code and press ‘Ctrl+Spacebar’ to expand it.
-OR-
• Right click in the ‘Name’ field on the Ledger (Banking) screen to select from the list of Repetitive Payees. The selection list also contains a ‘Search For’ box to find items more easily.
-OR-
• Click on the Ellipsis button, ![]() , to open the Repetitive Payees List screen. Find a payee and click on the ‘Select’ button or you can add a new code by clicking on the ‘New Item’ button.
, to open the Repetitive Payees List screen. Find a payee and click on the ‘Select’ button or you can add a new code by clicking on the ‘New Item’ button.
Category
‘Category’ is a required field. Choose whichever category applies to the transaction. Trustee Suite provides a report of categories defined by the Executive U.S. Trustee’s Office.
Description
Enter a Description for the transaction or use an existing Ledger Descriptions code previously set up via the ‘Tables’ tab on the top Main Menu Bar tool bar (File Menu); ‘Tables’ > ‘Ledger Description List’.
TIP – Descriptions can also be added or modified directly from the Ledger (Banking) screen. Simply double click on the description field of the transaction in the grid to make your changes. Your changes will be saved automatically.
There are three ways to use Ledger Description Codes:
• Type the code and press ‘Ctrl+Spacebar’ to expand it.
-OR-
• Right click in the ‘Description’ field on the Ledger (Banking) screen to select from the list of Ledger Descriptions. The selection list also contains a ‘Search For’ box to find items more easily.
-OR-
• Click on the Ellipsis button, ![]() , to open the Ledger Descriptions screen. Find a description and click on the ‘Select’ button or you can add a new code by clicking on the ‘New Item’ button.
, to open the Ledger Descriptions screen. Find a description and click on the ‘Select’ button or you can add a new code by clicking on the ‘New Item’ button.
Comment
Enter a Comment, if desired. This is an “internal”, non-printing memo. You can also use an existing Ledger Descriptions code in the ‘Comment’ field.
1. Type the Ledger Description code and press ‘Ctrl+Spacebar’ to expand it.
2. Right click in the ‘Comment’ field to select from the list of Ledger Descriptions. The selection list also contains a ‘Search For’ box to find items more easily.
Transfer – Click this checkbox if the item is an intra-account transfer. This is primarily used when transferring funds from one bank to another.
Claim – This function is found on the Disbursement Adjustment and Disbursement Reversal pages and is used the same way as described in the Add Deposits Adjustments page of this help file.
Entered By/Entered On – These fields will display the name of the person that entered the Adjustment or Memo and on what date.
Modify an Adjustment
Double click on the transfer in the Ledger (Banking) screen grid or highlight (single click) the transfer on the grid and click on the ‘Show Details’ button.
Per the EOUST, once the adjustment is saved, you cannot edit the date or amount of the transaction. It is required that the adjustment be reversed with another adjustment. For example, if you entered the wrong date on a deposit increase (adjustment) and then Saved it.
To Reverse an Adjustment:
- Click on ‘Add Other Entries’.
- Choose ‘Deposit’ (to increase or decrease the receipt column) or ‘Disbursement’ (to increase or decrease the disbursement column).
- Select the plus, +, or minus, -, icon to adjust the entry. Pay close attention to the description below the plus and minus icons to ensure you are properly increasing or decreasing the applicable column.
- Enter the same incorrect information (date is the same incorrect date), a description and the asset/claim reference if there was one originally.
- Click on ‘Save’.