Users can track their Adversary cases from within the Case Information screen, Document List and Document Management. The Adversary icon,  , in Document Management and Document List enables the user to quickly jump from the main case’s documents to all related Adversary case documents. A one-time setup of the Adversary case in the Case Information screen’s ‘Adversaries’ tab creates a folder in Document Management associated to the main case; or, ECF technology automatically creates the folder in Document Management when an adversary email is sent by the court.
- From the Case Information screen (invoked via clicking on the ‘Case’ tab in the Form Selection toolbar on the far left side of the screen) – The ‘Adversaries’ tab, at the far right of the existing tabs, will turn green when Adversaries have been associated with the case. The user can Add and Delete Adversaries using the ‘Add’ and ‘Remove’ buttons located at the bottom of the screen shown below. Notes can be entered manually or by using QuikText entries (see the Use QuikText Descriptions page of this Help File for an explanation of how to use this functionality). When Notes have been entered, an ‘*’ will appear in the right column of the grid.

- From Document Management (invoked via clicking on the ‘Document Management’ tab in the Trustee Suite Main Menu toolbar) – Adversary cases associated with an existing case can be accessed by clicking on the ‘target’ icon, . Adversary cases look the same as Personal folders with the ‘^’ at the beginning and end of the name.
- From Document List (invoked via clicking on the ‘Case’ tab in the Form Selection toolbar on the far left side of the screen and then the ‘Document List’ link from the Case sub-menu beneath the tabs on the far left side of the screen) – Clicking on the ‘target’ icon, , opens a list of all related cases, including the current selected case. Selecting a case from the target’s list filters the document in view.
Under the ‘Selected View’ tab in Document Management, the ‘Batch Move’ icon, ![]() , assists the user with updating and moving documents to Adversary cases.
, assists the user with updating and moving documents to Adversary cases.
Report
From the Form Selection toolbar on the far left side of the screen, click on the ‘Reports’ tab, select the ‘Case’ tab from the Print Reports screen and select ‘Adversary Case Report’, which invokes the Adversary Case Report screen (shown below) with the following options:
- Case – Select the case number by clicking on the field, which invokes a drop-down list, or leave as ‘-ALL-‘ (the default).
- Group by – Select the type of case, ‘Bankruptcy Case’ or ‘Adversary Case’, via the radio buttons.
- Sort by – Select ‘Case No.’ or ‘Name’ via selecting the appropriate radio button.

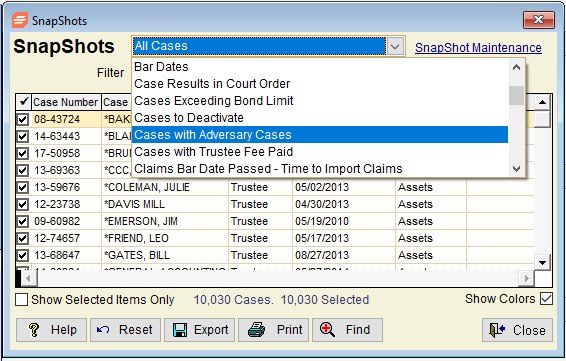
SnapShot
Cases with Adversary cases are available as a core SnapShot. From the Trustee Suite Main Menu toolbar, click on the ‘SnapShots’ tab, which invokes the SnapShots screen, and then click on the down-arrow at the top of the screen and select ‘Cases with Adversary Cases’ as shown below.