
Accounts
Bank accounts are opened via online banking with Mechanics Bank right from your computer.
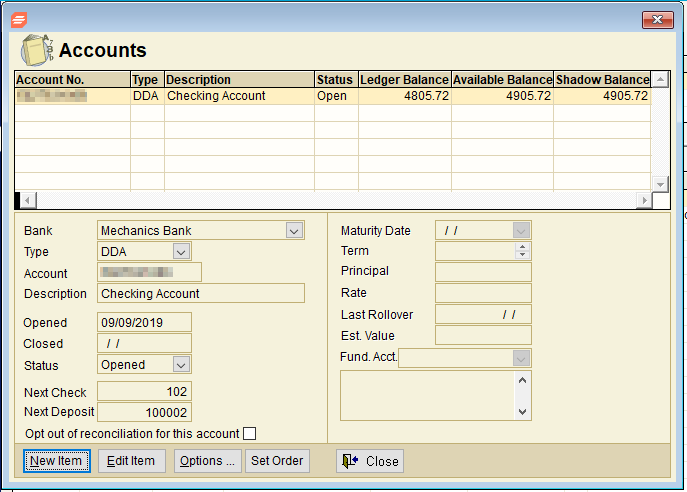
Accounts Screen
Account information is shown at the top section of the Accounts screen (shown below and accessed via selecting the ‘Banking’ tab from the Form Selection toolbar on the far left side of the page and the ‘Accounts’ link from the Banking sub-menu beneath the tabs on the far left side of the page), making it easy to switch between accounts in the same screen.
The Accounts screen displays account information related to the selected case. Account information is added manually to the Accounts screen. Accounts can be closed with closeout transfers, from the ‘Accounts to Close’ link on the Home Page or from the ‘Status’ drop-down menu on the Accounts screen.
The Accounts screen displays all accounts for the case in whichever sort order you choose.
Open Accounts Screen
There are two ways to access the Accounts screen (shown above):
1. From the ‘New’ Link on the Banking screen:
• Click on the ‘Banking tab’ on the Form Selection toolbar on the far left side of the screen.
• Click on the ‘New’ link at the top right of the Banking screen.
2. From the Form Selection toolbar Banking sub-menu (beneath the tabs on the far left side of the screen):
• Click on the ‘Accounts’ link.
Opening a New Account
The account information fields below provide all of the information entered for an account. To view more information than the accounts grid provides, simply click on an account link on the grid.
1. Bank: The Mechanics Bank selection will be displayed. If you are using a bank other that Mechanics Bank, contact support (Stretto Support Center at 800-634-7734), to have the bank name and details entered.
2. Type: Will default to DDA/checking account.
Note: Once an account type has been selected and saved it cannot be changed.
3. Account: Each trustee has a set of account numbers preloaded for use. Trustee Suite will automatically use the next in sequence. If you run out of account numbers, contact support for assistance. If you use another bank, support will manually enter the account number. The account number cannot be changed after opening the account.
4. Description: “Checking Account” will appear in this field by default. You may change the Name (Description), if desired. Customize the description (e.g., “Payroll Account” or “Escrow Account”) by typing in the ‘Description’ field, or leave the default information provided.
TIP – If you will be using more than one account with the same account type (e.g., several checking accounts), give each one a different description to make the listing more informative.
5. Opened (Date): The date displayed reflects the date the bank received the deposits.
Note: This field cannot be modified after saving the new account information.
6. Closed (Date): This field will be filled in when the ‘Status’ field (as described in step 7) is set to “Closed”.
7. Status: This field (a drop-down menu) indicates if the account is “Open” or “Closed”. To close an account, change the account to “Closed” and click on ‘Save’.
Note about Closing Accounts: Zeroing out an account’s balance will not close the account at the bank. To close accounts, go to the account and change the Status to “Closed”.
8. Next Check: This field allows you to specify your starting check number, if desired. Trustee Suite uses a default starting check number of 101 for checking accounts. You can change this number if necessary. Once the first check has been written, the next number, and any subsequent numbers, cannot be changed. Sequential numbering will be automatic. Trustee Suite does not allow duplicate check numbers on any account.
9. Next Deposit: The default starting Deposit Number for Mechanics Bank accounts is 100001. This number is only recorded by Trustee Suite and the bank.
Note: You can change the ‘Next Check’ and ‘Next Deposit’ numbers now but you cannot change these fields after you save.
10. Ledger Balance (in the grid): This number represents the total funds for an account after the deposits and transfers you have made and all the checks you have issued. (This is roughly the same idea as the balance that you maintain in your personal checkbook as you write checks and make deposits.) The Ledger Balance is the amount that will appear as the account balance at the bottom of Form 2 or the Ledger Report.
Note: The difference between the Ledger Balance and Bank Balance is transactions in transition (i.e., transfers, outstanding checks and deposits).
11. Available Balance (in the grid): This number is the actual amount of funds that are available in your account as of the start of the business day from your last successful transmission. This may differ from your ledger balance if you have outstanding checks or deposits. To learn more about the time frames for deposited funds to become available, see Mechanics Bank’s Operating Guidelines, which can be accessed from the Trustee Suite Help menus. From the top Main Menu toolbar, select ‘Help’ > ‘Bank Guidelines’.
12. Opt out of reconciliation for this account checkbox: This option will exclude this account from participating in the bank reconciliation feature and reports.
13. Maturity Date: Enter the appropriate maturity date using the drop-down menu provided.
14. Term: Enter the term from the options provided, as applicable.
15. Principal: Enter the principal amount here, as applicable.
16. Rate: Enter the appropriate rate here, as applicable.
17. Last Rollover: Enter the last rollover date here, as applicable.
18. Est. Value: Enter the estimated value here, as applicable.
19. Fund. Acct.: Select the appropriate option, as applicable, from the provided drop-down.
20. Set Order: Click on the ‘Set Order’ button at the bottom of the screen to change the order of the account list. Click and drag the boxes to the left of the account numbers in the manner which you prefer. Click on ‘OK’ to save. Click on ‘Reset’ or ‘Standard’ to revert to the original order.