Accessing the Auditor
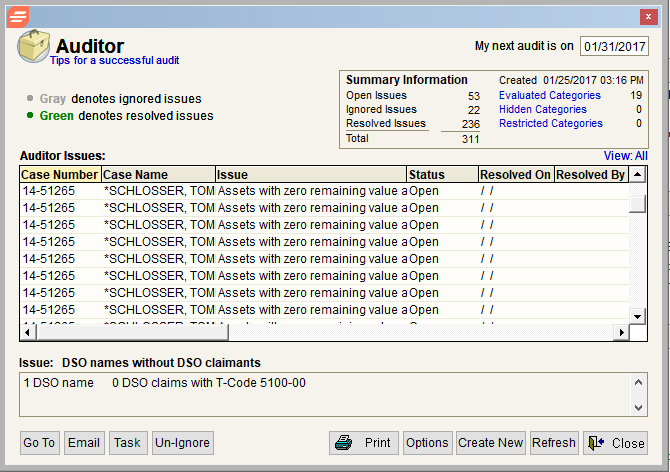
From the top Main Menu toolbar (File Menu), select ‘Case Administration’ > ‘Auditor’, which invokes the Auditor screen as shown below.

Auditor Issues – This feature tests for over 40 possible issues, including:
- No Asset cases older than 60 days
- No Asset cases with money on hand
- No Asset cases with assets on file
- Cases missing petition date
- Cases missing Judge
- Cases without 341(a) Date
- Cases with future 341(a) Date and Tax Return not verified
- Cases with future 341(a) Date and Payment Advice not verified
- Cases with future 341(a) Date and Debtor Ed. not verified
- Cases with concluded 341(a) meeting and Credit Counseling not verified
- DSO Cases without DSO claimant.
- Cases with outstanding DSO Initial Letter
- Cases with outstanding DSO Discharge Letter
- Asset cases without a Claims Bar Date (option to include or exclude on closed cases)
- Asset case with an NDR Date
- Asset cases without Internal Memo notes
- Asset cases without Next Activity Memo notes
- Asset cases without External Memo notes
- Asset cases with printed checks over 90 days old and no TDR date
- Asset cases with missing or expired ETFR date
- Asset cases with TFR date and Trustee Compensation not paid
- Assets with zero remaining value and not FA
- Assets marked FA without an abandonment type selected
- Closed cases with remaining values on assets
- Deposits outstanding more than 3 days
- Deposits with unbalanced asset links (not all gross allocated to asset)
- Claims with unbalanced disbursements
- Closed cases with funds on hand
- Duplicate check numbers
- Gaps in check number sequence
- Overdrawn bank accounts
- Ledger entry with blank descriptions
- Transfer outstanding more than 2 days
- Missing Tax ID numbers for cases with bank accounts
- Missing Tax ID numbers for Wage and 1099 claims
- Aged Cases (x days or more)
- Stale Checks
- Cases with expired Bonds
- Under-bonded cases
- Open Cases with Personal Injury Assets
- Deposit not tied to receipts log
- Receipt Log entry not associated to a deposit
Security Rights – From the Security feature (from the top Main Menu toolbar (File Menu), select ‘Security’, which invokes the Security Information window (shown below), and then click on the ‘User Rights (page 2)’ tab), rights can be assigned/removed by selecting the ‘Auditor’ checkbox (shown on the right side of the screen below near the bottom of the list).

Working in the Auditor Screen
The columns in the Account screen grid (shown in the first screenshot above) are sortable by clicking on the header(s). The only editable field in the grid is the ‘Comments’ field. Click in the field to enter Comments.
When an item is highlighted, the additional detail regarding the audit item is displayed in the lower box below the grid. Multiple issues will display in numerical/logical order.
Double click on the issue or use the ‘Go To’ button to open the issue for resolution.
Summary Information: Located in the upper right corner of the screen, the ‘Summary Information’ details the number of audit issues, Date and Time of Audit and links into the Categories, outlined in the next section.
Auditor Screen Features
The following features are available in the Auditor screen (shown in the first screenshot above):
- Evaluated Categories link – These tests are considered for audit selection.
- Hidden Categories link – These tests are removed from audit selection.
- Restricted Categories link – The user does not have security rights to resolve these audit issues.
Create New – This button (at the bottom of the first screen above) invokes the screen shown below and enables the user to run a new audit based on select test issues, while also allowing the user to control the case selection if desired. The user can exclude test items by deselecting each item from within the grid below; they will appear as hidden items as shown below.

Note: The Auditor is run system-wide, not based on individual user IDs. Anyone with security rights can create new and overwrite the previous Auditor results.
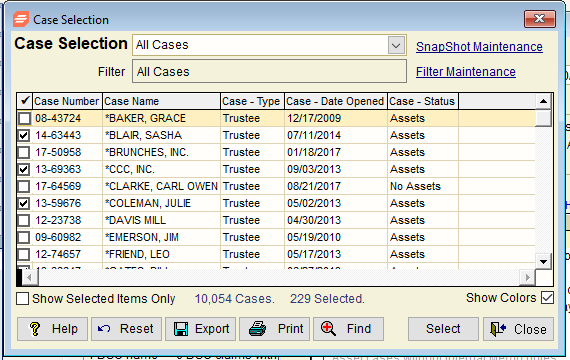
Select Cases button (top right of the screen above) – When creating new audit queries, users can select specific cases for auditing. Clicking on ‘Select Cases’ opens the Case Selection window shown below, and when selecting (or checking) a case and clicking on the ‘Select’ button in the lower right corner of the screen below, which applies a SnapShot to filter the case selection, the ‘Select Cases’ button text turns green, as shown in the second screenshot below.


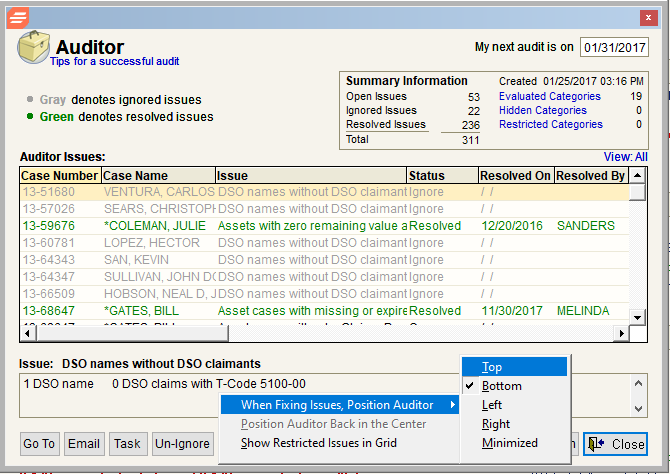
Issue Status (text color designation within the grid):
- Black – Open item, Including Tasks and Email
- Gray – Ignored item
- Green – Resolved Item
- Red – Restricted item
Email – Clicking on the ’email’ button prompts users to select between ‘Stretto Help Desk’ or ‘Personal Address Book’. The status is set to email regardless of whether the email was sent.
Task – The ‘task’ button opens a Task screen (shown below). If a Task was created, then the issue status is set to ‘Task’.

Options Button
Via the ‘Options’ button in the Auditor screen (shown in the first screenshot above), the Auditor enables the user to “dock” the issues grid while it links to the Trustee Suite field for resolution. This processing of docking allows the user to still view the issues while working within Trustee Suite to resolve the items. Clicking on the ‘Options’ button invokes the following screen with the options shown and listed and described below.

- When Fixing Issues, Position Auditor: Select from Top, Bottom, Left, Right or Minimized.
- Position the Auditor Back in the Center: undocks the Auditor and remembers the old position and size).
- Show Restricted issues in Grid: shows issues that the user does not have access to fix. It will show the issue information such as case and status but will display “Restricted” instead of the record identifying information.
Reports
The ‘Print’ button in the Auditor screen (shown in the first screenshot above) provides an option to produce reports based on the Audit information.
Issue Status: Select from ‘All’, ‘Unresolved’ or ‘Resolved’.
Sort Options:
- Case Number, Issue
- Case Name, Issue
- Issue Category, Case Number
- Issue Category, Case Name
Include Issue Details: Checking this option will pull the description of the issue to the report.
Include Comments: Checking this option will pull the optional Comments to the report.
