
When opened, the calendar will automatically default to the appointment page for the current day and a new category, ‘Calendar For’, will be added to the menu bar.
When the Calendar feature is open, click on ‘Calendar For’ to view the Calendar Menu, as shown below. Selecting one of the menu options will invoke the second screenshot shown below.

Calendar Overview
To more easily manage your schedule, there are three kinds of reminders: appointments, tasks and notes. Each system user is considered a resource (a resource can also be a room, piece of equipment, etc. whose time needs to be allocated). Each resource can have a single (but unlimited) note per day, an unlimited set of appointments per day and an unlimited set of tasks per day. In addition, each task and appointment can have notes attached to them.
Unless marked private, all appointments, tasks and notes can be viewed by anyone with access to the system. Positioning your mouse over an item in the Appt. Day or Week will show the time and description as a ToolTip (if it is yours and/or it is not marked private).
The visual calendar includes a flexible range of features that includes a daily planner, weekly appointment book, prioritization of events, daily details, printing of schedules, long-term planning, meeting descriptions and easy notification for recurring events.

Calendar Menu
Many of the Calendar’s functions can also be accessed from the Calendar Menu. The menu has many of the same functions as the main calendar page. You may use either of the methods to access the function.
To access the Calendar Menu, click on ‘Calendar’ from the top Main Menu toolbar (File Menu) when the Calendar screen is open.
Calendar Tool Buttons
The Calendar Tool buttons are located just above the Notes area of the Trustee Suite Calendar. These are used to either drop an appointment to perform the associated task, or you may also simply click on the buttons.
Calendar Toolbar from left to right: ‘New’, ‘Edit’ and ‘Delete’.
Calendar button functions:
Zoom Button: Shows a zoom view of appointments (in the Daily, Weekly and Planner screens) as well as tasks (the To-Do page). See the Calendar Zoom View section below for more information.
Create Button: Creates appointments or tasks. Select the Appointment or Task page and click on the ‘Create’ button.
Edit Button: Allows the user to edit appointments or tasks.
Print Button: Displays the Print window in any of the available views.
Delete Button: Functions in two ways in deleting appointments or tasks:
- Click on the ‘Delete’ button, then click on the appointment or task. This will bring up a verification window for the deletion of the selected object.-OR-
- Click on ‘Yes’ or ‘No’ as desired; or, click on the appointment or task, hold the left mouse button down and drag the object to the ‘Delete’ button. The same verification window brings up a verification box asking if you are sure you want to delete the appointment or task. Click on ‘Yes’ or ‘No’ as desired.
Calendar Zoom View
The Zoom View gives you additional flexibility with the first three pages from the main page. The Zoom View will open a new window that may be resized to your desires.
The Zoom View allows for scrolling vertically or horizontally. On the Appt page, you can click on the left or right scroll arrows to see earlier and later times, respectively. You may click on the horizontal lines to move up and down the list of appointments.
You may drag and drop appointments between this window, the main page and the Monthly view.
Weekly (Zoom View)
Clicking on the arrows here will change the size of the window.
On the Weekly page, you can click on the scroll arrows to make the window bigger and smaller.
You may drag and drop appointments between this window, the main page and the Monthly View.
Planner (Zoom View)
On the Planner page, you can click on the left or right scroll arrows to see earlier and later times. You may click on the horizontal lines to move up and down the list of resources.
You may drag and drop appointments between this window, the main page and the Monthly View.
Calendar Monthly View
Although the Monthly View may take a moment to load, it is a very handy page to manage an entire month’s appointments and tasks. (It is accessed by opening the ‘Calendar option from the top Main Menu toolbar (File Menu) and selecting ‘Month View’.) The Monthly View can be resized.

The Monthly View will load all appointments, notes and tasks for an entire month into one easy-to-use, easy-to-read interface. To see a list of events for a day, click on the down-arrow to the right of the list for a given day. The list will pop out showing all events for that day in order.
You may create a task or appointment for a day by clicking on the button for that day. If the main page is on Page 1 through 3, it will create an appointment; otherwise, it will create a task.
You may also want to drag and drop an appointment onto a day button to move appointments from one day to another.
Note: To refresh the window, click on the ‘Today’ button at the bottom of the screen.
Calendar Drag and Drop Operations
Dragging
Dragging a task or appointment to any one of the Calendar buttons allows the user the same functions as those listed above. You may also drag any appointment to a day on the mini-calendar or onto one of the calendar tool buttons located between the notes and the mini-calendar.
Dragging an item to the ‘Delete’ button terminates the current item. Dragging an item to the ‘Zoom’ button allows editing of the appointment or task. If you drag an appointment onto the ‘Create’ button, you may then edit a copy of it.
Dragging an appointment to the Notes area adds text to the notes for the current day. Adding an appointment or task is done in two ways: You can click on the ‘Create’ tool button, or double click in an open area to bring up the Calendar window.
Dragging a Recurring Appointment
When dragging a recurring appointment, you will be asked if you want to move all of the linked appointments. If you answer ‘No’, then it will remove that appointment from the set of recurring appointments. If you answer ‘Yes’, it will move all of the appointments in a similar manner. For instance, if you move a recurring appointment forward one day, and ahead one hour, then it will move all of the appointments forward one day, and ahead one hour.
Dragging a Group Meeting
When dragging a meeting, you will be asked if you want to move all of the linked appointments (other resources that are involved in the meeting). If you answer ‘No’, then it will remove that resource from the set of meeting participants. If you answer ‘Yes’, it will find all of the related appointments with other resources, and move them to the same time and date.
Dragging a Recurring Meeting
When dragging a recurring meeting, you will be asked if you want to move all of that resource’s recurring appointments. If you answer ‘No’, it will remove that appointment from the set of recurring appointments. You will then be asked if you want to move all of the linked appointments (other resources that are involved in the meeting). If you answer ‘No’, it will remove that resource from the set of meeting participants.
Calendar – Main Page
The Calendar – Main page is divided into three sections: the view pages, a mini calendar and a note section. Each main page has a “current day” which appears in red in the mini-calendar view. On the main page, you will also see a round black or white circle in the lower left corner. As you go from week to week, it will change from black to partial black/white to completely white. This picture indicates the phase of the moon.
To close the Calendar – Main page, either press the ‘ESC’ key or click on the ‘Done’ button.
Each resource (person, room, equipment, etc.) has its own notes-per-day, appointments-per-day and tasks-per-day. The resource notes for a given day appear in the view pages 1 through 3, and the tasks appear on the fourth view page. To move to a page, simply click on that page name (the ‘Notebook’ tab). To refresh a page, click on the page name again.
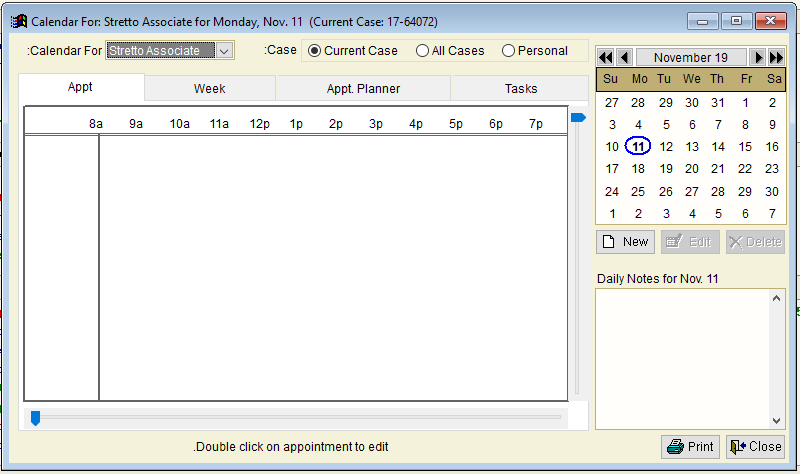
Calendar – Appointment Page
The Calendar – Appointment page shows all of the appointments for the current day for the current resource. Each appointment on this day (for this resource) will be displayed on its own line. Each line will show the icon image associated with the appointment, as well as the description of the appointment. To the right of the icon and description, you will see a rectangle indicating the start time, ending time and color of the appointment.
From here, you may drag and drop an appointment to a different time.
- Single clicking on the appointment will bring it up for editing.
- Double clicking on the icon or appointment description will also allow editing.
- Double clicking in an open area will allow creation of a new appointment at that time location.
Each appointment that has been scheduled is shown on its own line. You have the ability to select icon and colors to represent and categorize their appointments.
Note: To refresh a calendar page, click on the ‘Page’ tab when that page is active, and Trustee Suite will update the page with any new information.
Calendar – Week Page
The Calendar – Week page shows all of the appointments for the current week for the current resource starting with the first day of the week and lasting 7 days. From here, you may drag and drop an appointment to a different time or day.
- Single clicking on the appointment will bring it up for editing.
- Double clicking in an open area will allow for the creation of a new appointment on the day-time location.
- You may also drag an appointment to a day on the mini-calendar or onto one of the tool buttons between the notes and the mini-calendar. Dragging an appointment to the notes area will add text to the notes for the current day.
- You may add an appointment by clicking on the ‘Create’ tool button, or by double clicking in an open area.
Calendar – Planner Page
You can schedule appointments with others in the Planner page.
The Calendar – Planner page shows all of the appointments for the current day for the current resource and all of the other resources that the current resource has access to. The appointments are shown on a single line per resource. From here, you may drag and drop an appointment to a different time, day or resource (if you have access to others).
- Single clicking on the appointment will bring it up for editing (if you have access).
- Double clicking in an open area will allow creation of a new appointment on the day-time-resource location.
- You may also drag any appointment to a day on the mini-calendar or onto one of the tool buttons between the notes and the mini-calendar. Dragging an appointment to the notes area will add text to the notes for the current day.
- You may add an appointment by clicking on the ‘Create’ tool button, or by double clicking in an open area.
Note: You never have access to other resource’s appointments that are marked ‘private’.
Calendar – Tasks Page
The Calendar – Tasks page shows all of the tasks for the current day for the current resource, as well as this resource’s uncompleted tasks. You may add, edit, view or delete a task by clicking on the tool buttons.
[screen] The Tasks page allows you to see all of today’s tasks, and all of the uncompleted past tasks.
- To create a task, click on the ‘Create’ tool button.
- Moving from row to row on the task page will change the icon image to the right of the list to be the one associated with the current task.
- To edit a task, go to the row you wish to change and click on the ‘Edit’ tool button. To delete a task, go to the row you wish to delete and click on the ‘Delete’ tool button.
The Task feature is similar to the Appointment feature. However, there are no times associated with a Task and all tasks are private.
Note: Past completed tasks will not show up on your task views on the Main Calendar page.
Mini-Calendar
The Mini-Calendar displays the current system month.
The Mini-Calendar Color Legend
White: The day is not in the current month and no events have been scheduled on that day.
Light blue: The day is not in the current month but at least one event has been scheduled on that day.
Yellow: The day is the current system date.
Dark blue: The day is in the current month and has at least one event scheduled on that day.
Red: The date being modified.
- Click on any day in the mini-calendar to activate that day. The date will appear in red.
- Double clicking on any day will bring up the Go To a Date window. Enter the date needed in this window to get to that date quickly.
- Use the mini-calendar to drop appointments from one day to another.
- Clicking on the month and year will bring up the Month view.
- Clicking on the arrows will take you back one year (<<), back one month (<), forward one month (>) and forward one year (>>).
- Clicking on the pull-away corner will take you to the next month.
Note: To the left of the month columns are the week numbers of the year.
Appointment Form
The Appointment Form has the following six tab sections: ‘Appointment’, ‘Display’, ‘With’, ‘Recurring’, ‘Meeting’ and ‘Notes’.
- Appointment: When creating an appointment, you have the ability to set the time, date and description on the Appointment Page.
- Display: On the Display page, you can set the icon and color.
- With: The With page allows you to schedule an appointment with someone and store information about them.
- Recurring: The Recurring page allows you to create recurring appointments in many different styles.
- Meeting: The Meeting page allows you to create appointments with your co-resources.
- Notes: The Notes page allows for expanded notes for each appointment.
Appointments and Tasks are very similar as far as the details of creating them are concerned.
Neither of these types allows for editing the recurring or meeting information; the Recurring page and Meeting page are read-only when editing a Task or Appointment.
Appointment Page
When you create a new appointment (‘Create’ button) or click on an existing appointment, the Appointment page will open.
The Appointment page allows you to edit the time, date and status of an appointment. Clicking on the Ellipsis button, ![]() , will bring up the Pick-a-Date page.
, will bring up the Pick-a-Date page.
[screen] The Appointment page shows the basic details of an appointment.
You must provide a description, date and beginning and end times. In addition, the end time must be later than the begin time.
[screen] The Pick-a-Date page colors follow the same coding as in the Calendar – Main page. Double click to select a date.
The date fields have shortcut keys as follows:
| Keystroke | Meaning |
| t or T | Today |
| + | forward one day |
| – or = | backward one day |
| m or M | beginning of current month |
| h or H | end of the current month |
| y or Y | beginning of the year |
| r or R | end of the year |
| ^Pg Up | forward one month |
| ^Pg Dn | backward one month |
Appointment – Display Page
The Appointment – Display page allows you to change the color and icon associated with an appointment.
[screen] The Display page shows the visual settings of an appointment or task.
The wallpaper behind the Appointment – Display page will also change to reflect the color selected.
Appointment – with Page
The Appointment – With page schedules appointments with other people. Select from the list of people in the ‘From’ list and click on ‘With’. You will then be able to select the resource for which you would like to have the appointment.
Appointment – Recurring Page
The Appointment – Recurring page allows you to create appointments that will occur at regular intervals.
The Recurring page allows editing of recurring appointments and allows checking for conflicts with you or anyone from the Meeting page.
You may schedule the following types of recurring appointments:
- Single Appointment: Occurs only once
- Daily: Every day
- Weekly: Every specified weekday
- Periodically: Every ‘x’ Days
- Monthly: Use for short months
- Monthly: Every x day of the month
- Monthly: Every ‘x’ day in ‘x’ week of the month
- Yearly: Every specified day
- Yearly: Every ‘x’ day in ‘x’ week of the year
- Weekday: Every weekday but not weekends
If you would like to check to see how many appointments were created, click on the ‘Check’ button. To check for conflicts, select the ‘Check for Conflicts’ box, and then click on the ‘Check’ button. This will look for anyone that you have selected on the Meeting page as well.
Appointment – Meeting Page
The Appointment – Meeting page allows you to create joint appointments between groups of resources and schedule meetings and recurring appointments or Tasks with other resources.
Note: The Meeting Page is only available when creating an appointment.
Simply select the names you would like to move from the list of Resources to the list of Schedule Appts for, and click on the ‘>’ button.
Note: You may double click on any name, drag and drop them or select many at once using the shift-click and control-click on your keyboard and mouse.
Move all resources that you wish to schedule an appointment with to the right-hand group. Any resource that you select will be “linked” to your meeting. Later, you may reschedule the appointment and the Calendar will automatically adjust everyone’s schedule accordingly.
Appointment – Notes Page
The Appointment – Notes page allows you to keep detailed notes on any appointment. Reminders in the Notes page appear in the Daily and Weekly Calendar views.
There are no limits or style constraints on the notes. You may keep track of a note’s history, status or other related information.
Calendar Reports
There are many reports and report formats that you can run from Calendar.
To access reports, select the ‘Print’ option from the Calendar Menu Bar, which invokes the Reports page.
Simply select a report to run, the destination (page or printer) and the associated date.
Searching for Text
The Search is available by selecting ‘Search’ from the Calendar Menu.
The Search page allows you to search through all appointments, tasks and notes.
The search will return all matches in the window at the bottom of the page. Select the match you would like to see in more detail and click on the ‘Go To’ button.
Deleting Events
It is a good idea to delete your old events when you no longer need them.
The Delete page allows you to clean up old appointments, tasks and notes.
Simply select ‘Delete’ from the Calendar Menu and select the appropriate items to delete.