
Document Management is a powerful tool that allows you to manage all of your case documents in one central location. If you have the ECF Client feature available on your computer, Document Management will also help manage the ECF documents you receive from your court. The interface for Document Management allows you to customize documents to your needs and further expands the capabilities within Trustee Suite to help manage your caseload.
Working with Document Management
Clicking the ‘Document Management’ link on the Trustee Suite Main Menu toolbar will activate the ‘Document Management’ interface.

Located at the top of the Document Management screen are colored links to different ‘Views’ (in the form of tabs, also shown below in the The View Links section) that are available to you. These Views help you to access your Document Management records in an organized and efficient manner. All of the Views share a similar screen design.
Each is divided into two sides, the left and the right.
- The left side is a grid that displays all of the records selected in the chosen view.
- The right side of the screen displays detailed information about the record highlighted in the grid to the left.
Document Management is organized in the following sections:
Case Selection Field
This section is where you may change the case. In the ‘Case’ text field, single click on the existing case, which invokes the window shown below, allowing you to change the case.

DocFilter
The DocFilter section, located under the case name/number (the text field after ‘Case:’ as shown below), offers filtering the list (in the grid shown in the screenshot in The Grid section below) by both Sub-Folder (category) and by Document Type (Word, Adobe, WordPerfect, etc.) More detailed information regarding the DocFilter function can be found on the DocFilter page of this Help File.

Docket Links
The Docket links (‘Court Docket’ and ‘Document Management Docket’, shown above) are intended to be used as a snapshot of the case docket at the court, but can also be used as a snapshot of the document activity in a case. To view entries from the Docket itself you must be using Trustee Suite’s ECF downloading feature.
The Main Menu Toolbar
The Main Menu toolbar is shown below. Each option, when activated, reveals a drop-down menu. To access the menu, either click on the desired option or press the ‘Alt’ key and the option’s underlined letter (e.g., ‘Alt+D’ reveals the ‘Document’ drop-down menu). Using the Main Menu toolbar, you can select from the following options:
Document Tab Drop-down:
- New Document: Click on this option if you would like to add a new document into Document Management.
- Add Documents: Click on this option to browse and add files from your local machine or server.
- Delete Documents: Click on this option to permanently remove the selected record(s) from Document Management.
- Find Documents: This option opens the Find Documents screen to help you quickly locate a document.
- Retrieve Exported Documents: Select this option to quickly import documents that were exported using the ‘Export’ button in the 341(a) View or the Selected View.
- Edit Document Properties: Click on this option to begin editing details for the selected document.
- Selected Documents, which invokes an additional drop-down list, including:
- Export: Export documents to an HTML file.
- Append PDF Documents: First, select the PDF documents that you wish to append together and click on this. option. The Appending PDF Documents screen will appear to help you append your documents.
- Print: Print all selected documents to the default printer.
- Email: Attach and documents to email (will launch Outlook email automatically).
- Zip: Zips all the selected files into one file.
- Batch Move Document Properties: Enables users to move all documents to a sub-folder, personal folder or different case.
- Delete: Will permanently delete all selected records.
View Tab Drop-down:
See the next section, The View Links, for detailed information on Trustee Suite Views.
Reports Tab Drop-down:
- ECF Summary Report: Run this report to see a listing of all new ECF documents imported into Document Management for a specified day. This report is also available from the ECF View.
- ECF Case Import Report: Run this report to see a listing of all new Cases imported into Trustee Suite for a specified day. This report is also available from the ECF Case Import screen.
- ECF Log Report: Run this report to see a log of the activity during Fetch for the selected date. This log also includes an option to see all dates updated by ECF.
The View Links
Across the top of the Document Management screen are the View Links (tabs) as shown below. These links act as the control center of Document Management because they control how your documents are displayed. When you click on each of the links, the documents displayed in the gird will be updated to match the criteria of the View you are selecting.
Case View: Displays all of the documents for a selected case in Document Management. This is the default view in Document Management. The Case View will always initially display the case active in Trustee Suite.
Selected View: Displays a list all cases (records) which have been selected via the checkboxes in the far left column of the grid in the left-hand pane in Document Management.
ECF View: Displays the records that are the result of the last ECF download. Specifically, this view will show all of your documents that were downloaded from Pacer based on the emails that you received from the court. Go to Option to customize this view depending on whether you want to view the ECF Fetch dog, or whether you want to show emails only and exclude back history. For more detailed information of the ECF View, go to the ECF View page of this Help File.
Find View: Use this feature to help you find any document quickly with the aid of a wide variety of tools and search criteria. Clicking on the ‘Find View’ tab invokes the Document Management | Find Documents screen, which contains fields you can populate to find a specific group of cases (records). Click on the ‘Find’ icon, ![]() , and these records will display in the grid in the left-hand pane of the Document Management screen.
, and these records will display in the grid in the left-hand pane of the Document Management screen.
Orphan Documents (not shown in the toolbar but accessed via the Main Menu Bar at the top of the screen; select ‘View’ > ‘Orphan Documents’). This view has three drop-down options from which you can choose: ‘Import Documents for the Current Case’, ‘Import Documents for All Cases’ and ‘Find All Orphan Documents’. Although it is not recommended, users can save documents to Document Management using Windows Explorer. Use the ‘Import Documents for the Current Case’ or ‘Import Documents for All Cases’ options to refresh the list of documents to include those added through Windows Explorer. Use the ‘Find All Orphan Documents’ option as a tool to help you correct any errors that may have occurred when adding, editing or deleting documents. For more detailed information on how to use the Orphan Documents functionality, see the Orphaned Documents page of this Help File.
![]()
The Grid
Each view has a Grid (in the left-hand pane of the Document Management screen) that displays your Document Management records as shown below. The current record is highlighted (yellow) and the details for the highlighted record are displayed in the right-hand pane of the Document Management screen (shown in the screenshot in the next section). Double clicking on or pressing ‘Enter’ while on a highlighted record will open the related document for viewing. The grid also displays line items by color so that you can easily see the status of each document (e.g., blue indicates un-read). More detailed information regarding the grid can be found on the Grid page of this Help File.

The Document Toolbar
The right-hand pane of the Document Management screen displays the Document Toolbar (shown below in the upper left corner of the screenshot).

Following describes the functionality of the toolbar icons (buttons):
New: You should use this button to enter documents into Document Management. You will be able to select a case number, document title, source, category, comments, the document’s description/detail and enter the path to the document you are adding.
When adding a new record, the case number, source and category will default to that of the current highlighted record. You will be required to fill in the case number, document title and source fields for the new record.
Add a new document to Document Management by clicking on the ‘New’ button, which invokes the Document Management | Document Properties window shown below.
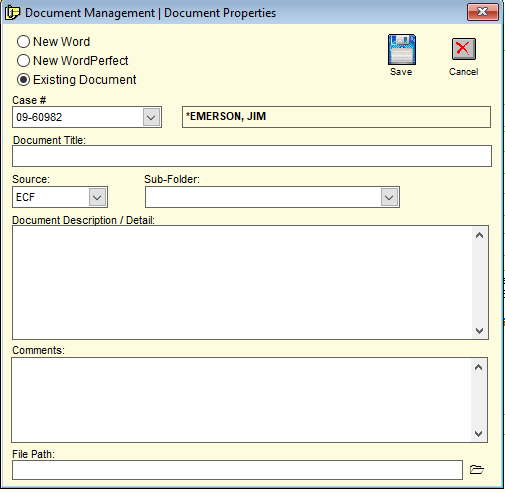
Options include:
- New Word – Selecting this radio button allows you to open a new Microsoft Word document.
- New WordPerfect – Selecting this radio button allows you to open a new WordPerfect document.
- Existing Document – Selecting this radio button allows you to choose an existing document.
After selecting an option, the following fields will be available:
- Case # – This field provides a drop-down menu which enables you to select a specific case number.
- Document Title: – This text field allows you to name the document. The name must be different than the File name. For example, ‘Receipt of Voluntary Petition (Chapter 13)(6:12-bk-35130)…’
- Source: – This field provides a drop-down menu that enables you to choose the appropriate source of the document (e.g., ECF, CASELINK, BANK, EMAIL, etc.)
- Sub-Folder: – This is an optional field which can be used as a filter in the document grid or in the Find View. To add a new Sub-Folder:
- Simply type in the name of the sub-folder; for example, “PETITION”.
- Click anywhere outside of the text field.
- You will be prompted to save it.
- Click on ‘Yes’. It will then be available in the drop-down list.
- Proof of Claim: – This field allows you to link a Proof of Claim document to one or more claims.
- Document Description / Detail: – This text field allows you to enter an appropriate description of the document and any pertinent details.
- Comments: – This text field enables you to enter appropriate comments regarding the document.
- File Path: (option only available if the ‘Existing Document’ radio button is selected – This field is where you provide the Associated File, which will be copied to the case folder when saved. There is a folder button to the right of the text field that allows you to select a file to attach to the document.
Click on the ‘Save’ button to save the new document or the ‘Cancel’ button to remove the new document.
Edit: The ‘Edit’ button opens the document detail section of Document Management for editing (the field beneath the toolbar icons under the Document File Properties section. Single click to highlight a new document record. To edit an existing document, from the grid in the left-hand pane of the Document Management screen:
- Select (single click on) the document you wish to edit.
- Click on the ‘Edit’ button to edit the document file information such as Case #, Document Title, Source (drop-down menu), Sub-Folder (drop-down menu), Document Description / Detail or Comments.
- Click on the ‘Save’ button to save your changes and the ‘Cancel button to discard your changes.
Open: This button allows you to open a document (new or existing).
- Select (single click on) the document you wish to open from the grid in the left-hand pane of the Document Management screen. Your document will open and be editable in the right-hand pane of the screen in the Document File Properties section.
- Click on the ‘Open’ button. Your document will open.
There are several other ways to open a document in Document Management:
- Double click in the Document File Properties section (the right-hand pane of the Document Management screen).
- Click on the highlighted record in the grid in the left-hand pane of the Document Management screen.
- Right click on the highlighted record and select ‘Open’ from the file menu.
- Hit ‘Enter’ on the highlighted record in the grid.
Print: The ‘Print’ button prints the selected (highlighted) document using the windows default printer.
Print a Single document:
- Select the document by single clicking on the item from the grid in the left-hand pane of the Document Management screen.
- Click on the ‘Print’ button. The document will to go to your default printer.
Print Multiple Documents:
- From any view in Document Management, select each document that you would like to print, placing a checkmark in the first column of the grid in the left-hand pane of the Document Management screen. You can select documents from multiple views or with different parameters in Document Management.
- Click on the ‘Selected View’ tab.
- Click on the ‘Print’ button.
Email: The ‘Email’ button in Document Management is used to email selected documents directly from Document Management.
Note: This email feature uses your Local email program, such as Outlook or Outlook Express. If you use a web-based email such as AOL, Yahoo or gmail, please call the Stretto Support Center at 800-634-7734 for assistance.
- Select the document(s) you wish to email by checking the box in the far left column of the grid in the left-hand pane of the Document Management screen. If you choose documents from several cases, click on the ‘Selected View’ tab to see all the items you have selected.
- Click the ‘Email’ button (located in the left-hand pane if you have chosen documents from the Selected View, or in the right-hand pane if you have chosen documents from the other Views). This invokes a window displaying the message “Include the words ‘Documents from Document Management for Case:’ in the Subject line?”. Select ‘Yes’, ‘No’ or ‘Cancel’ (if you do not wish to send the email). A second window appears which shows you how many documents you have selected and offers two options in the form of checkboxes, ‘Zip file(s)’ and ‘Create a message with the document detail’.
- Select the options:
- ZIP file(s) – This compresses the file(s) into a smaller “zip” file making it more efficient to email. The document(s) will automatically be attached to the email.
- Create a message with the document detail – The details of the document will appear in the email body, such as the case number, case name and document description.
- Click on ‘OK’. You will see your local email open, ready for you to select or enter the ‘To: address’.
Note: This feature allows you to use your addresses from your local address book.
Copy: The ‘Copy’ button automatically creates a copy of the highlighted document and adds it into the selected view. This feature is especially useful if you want to make notes in a document but also keep an original copy.
- Select the document you wish to copy.
- Click on the ‘Copy’ button.
- Click on ‘Yes’. You will then see two of the same documents in the grid to the left-hand pane of the Document Management screen.
e-File: The e-File feature is a quick and easy way to electronically file your documents from Document Management to your court. To prepare for e-Filing you must enter the court information in the Trustee Suite Trustee table, Trustee section (the Pacer user information is for importing the claims register and Creditor Mailing Matrix).
- Select a document by clicking in the grid in the left-hand pane of the Document Management screen (the row will turn yellow).
- Click on the ‘e-File’ button located in the right-hand pane of the Document Management screen.
- Trustee Suite will then automatically open your Internet browser, go to your court’s home page and log you in. It also copies the path to your document in the computer’s memory.
- Navigate to the appropriate location on the web site to e-File the document.
Note: If you have questions on how to navigate through to the court web site, please contact a representative at the court.
- Once you get to the field used to select the document, click in the white field (usually next to a ‘Browse’ button) and paste the link by either:
- Clicking on ‘Ctrl+V’ (paste) on your keyboard; or
- Clicking on ‘Edit’ from the top Main Menu toolbar (File Menu), then selecting ‘Paste’.
- Clicking on the ‘Close’ button at the bottom right side of the window.
Document Details
Document Details are displayed on the right side of the screen (as shown two screenshots above under the Document File Properties section). The information shown gives detailed information about the record highlighted in the grid to the left (shown in The Grid section above). You can use the Document Details section to review and add information to a record (via the Document Toolbar as mentioned above). Selecting ‘Edit’ in the Document Toolbar or clicking in any of the text fields in the detail area will enable editing. For more comprehensive information regarding Document Details, see the Document Details page of this Help File.
Preview Tab
The Preview mode (invoked by clicking on the ‘Preview’ tab shown two screenshots above in the upper right corner of the screen) displays the document selected from the Document Management grid. It is not recommended that you edit and save changes in documents when in the Preview mode.
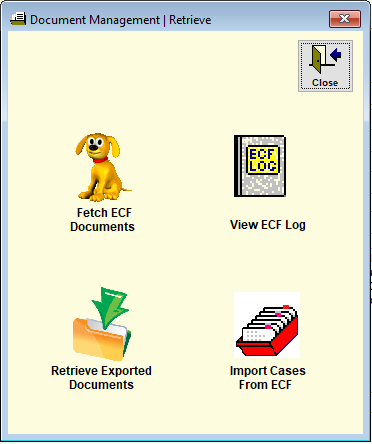
Retrieve Button
Located in the upper right corner of the Document Management screen is the ‘Retrieve’ button,  . This is a direct link to many ECF-related features and should be used as a command center for your ECF activities. From the Document Management | Retrieve window, you can Fetch ECF Documents, Import Cases From ECF, Retrieve Exported Documents and View the ECF Log via the respective buttons (icons). For more detailed information on the ‘Retrieve’ button, see the Retrieve Button page of this Help File.
Close Button
The ‘Close’ button, ![]() , located in the upper right corner of the Document Management screen closes Document Management.
, located in the upper right corner of the Document Management screen closes Document Management.