This can happen when you have not been notified of a case assignment or if you are receiving documents for non-chapter 7 cases. If the exception was created for a chapter 7 case and you have not received an import for this case, you can wait and let Trustee Suite map this case to the correct folder once you receive your case import. If this is a non-chapter 7 case, and you would like to move it out of the exception folder, follow the steps below.
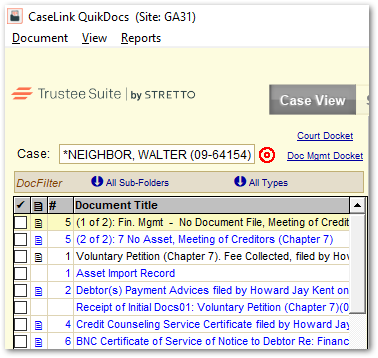
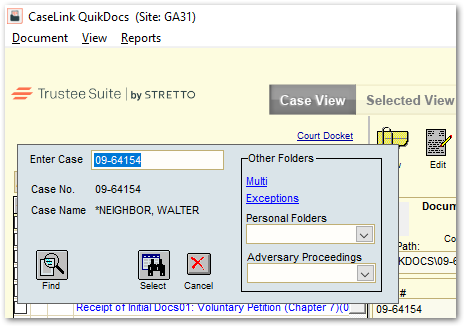
1. After opening Document Management by clicking on the ‘Document Management’ tab from the Trustee Suite Main Menu toolbar, click in the ‘Case’ search box (left click in the ‘Case:’ text field (shown below) to launch search options as shown in the second screenshot below. In this box, you will see an ‘Exceptions’ link. Click on the link.


2. Select the exception record in the grid that you would like to update.
3. Click on the ‘Resolve Exceptions’ button in the Document Toolbar (to the right of the ‘e-File’ button on the far right side of the screen shown below).

4. The Resolve Exceptions screen will appear, as shown below, giving you an overview of all the exception records with this court case number.

5. You have three ‘Actions’ and two ‘Apply to’ options:
• Action:
• Update Case Number to: shows list of existing cases.
• Delete Exception Document from Document Management: permanently deletes selected documents.
• Create a New Personal Folder for this case.
• Apply to:
• This Exception Document Only
• All Exception Documents with this Court Case No.
6. Click on the ‘Resolve’ button.
Note: Once you have resolved the exception record to a specific case or personal folder, Trustee Suite will continue to map all ECF documents with that specific court case number to the designated folder.
