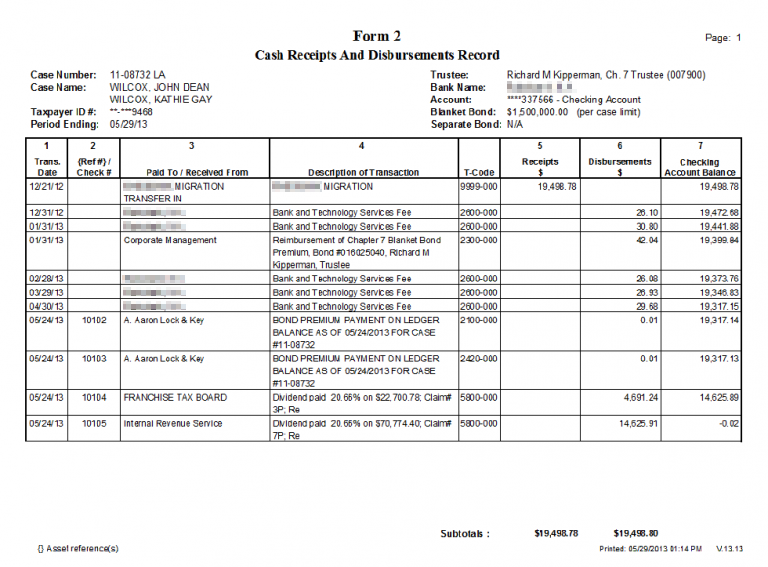
Rollovers of individual Certificate of Deposits should be reported on the same Form 2.
Form 2 submissions should contain all transactions, entered in chronological order as soon as they occur, from the beginning of the case until the end of the reporting period. However, the trustee may seek approval from the United States Trustee to limit the transactions in a Form 2 submission involving a very large or older case to the annual reporting period. Such approval would only be granted on a report-by-report basis.
If the trustee is serving as a successor trustee, Form 2 should begin with the balance turned over by the previous trustee, thereby remaining consistent with the successor trustee’s bank statements.
Accessing the Report
From the Trustee Suite Main Menu toolbar, select ‘Reports’, click on the ‘UST Forms’ tab and select ‘Form 1, 2 and 3’ from the Print Reports screen to invoke the Parameters for Forms 1, 2 and 3 screen (shown below).


Generating the Report
From the Parameters for Forms 1, 2 and 3 screen, populate the following fields:
- Generate: Select the ‘Form 2’ checkbox.
- Trustee: Select the Trustee number or ‘-All’.
- Case: Select the Case number via the drop-down box.
- Date Range: Enter the appropriate date range.
- Date Signed: Enter the date the form was signed (the default is the current date).
- Sort by: Select either ‘Case No.’ or ‘Case Name’ via the radio buttons.
Printing the Report
From the Parameters for Forms 1, 2 and 3 screen, select from the following options:
- Preview: Selecting this button enables you to view the form (shown above) before printing.
- Print: Selecting this button sends the report to the default printer.
- To PDF: This button prints the report to PDF and saves a copy to Document Management.
- Cancel: This button undoes any changes and cancels the print job.
- Save Defaults: This button sets the current field selections as the default each time this report is accessed.
- Options: Select the ‘Options’ button to invoke the following screen and then select the appropriate parameters:

Unique Form 1, 2 and 3 Parameters
- Trustees to Include when -All- is Chosen (leaving blank selects all): More than one Trustee generated report can be selected with this. To choose more than one Trustee, set the parameter screen Trustee field to ‘-All-‘ Then either type the list of Trustee numbers, separated by commas, or right click in the field and select Trustees from a list.
- Case Selection: Select either ‘All Cases’, ‘Asset Cases Only’, ‘No Asset Cases Only’ or ‘All Asset Cases and No Asset Cases when NDR > 341A + 120’ via the radio buttons.
- Orientation: Select either ‘Landscape’ or ‘Portrait’ via the radio buttons.
- Signature Line: Select ‘Form 2’ via the checkbox.
- Form 1 and 2:
- Select either ‘Include Cases with a Closed Date or TDR Date in the Period’ or ‘Include Cases with a TFR Date Before the End of the Period’.
- Collate: Select the appropriate option from the drop-down menu.
- Form 2 (seven checkboxes and a drop-down menu):
- Include Transactions Before the Beginning of the Period: Selected by default.
- Include Accounts with no Transactions in the Period: Selected by default.
- Include Memo Transactions with a Zero Amount: Selected by default. Allows Memo Transactions that have not been coded with a “Ledger Category Code,” to be included or excluded from Form 2.
- Print Transaction Addresses: Selected by default. Leaving this box unchecked shortens Form 2, as transaction addresses will be excluded. Only the “Paid To” and “Received From” names will be printed.
- Print Net Estate Calculation: Selecting this checkbox will provide a breakdown on Form 2 of how the net estate figure was calculated.
- Show Account #: Select as applicable.
- Show Detailed Account Totals: Select as applicable.
- Print Case Transfers Total: Select the appropriate option for the drop-down list.
- Set to 180 Day Reporting: When you click on this button, the Forms 1, 2 and 3 Options will be automatically set to the U.S. Trustee guidelines for 180 Day Reports.
- Footnote Fields (the text fields along the right side of the screen): One-character fields that you use to indicate on Form 1 and Form 2 certain features listed below.
- Transfer: A symbol in this field reports on Form 2 when a ledger transaction is a transfer in the receipts and disbursements column.
- Memo: On Form 2, this field will show when a memo has a category. Memo transactions without final report categories also appear when “Include Memo Transactions Without Final Report Code” is chosen.
- Voids & Refunds: A symbol in this field reports on Form 2 when a receipt is tied to a final ledger category of type expense and when a disbursement is tied to the Final Report category of income.
- Pay. to Debtor: Enter an appropriate character, as applicable.
- Non Compens. (compensables): This field also reports on Form 2 when ledger transactions are tied to categories “Exemptions paid to Debtor,” “Surplus to Debtor” and “Non-Estate funds paid to 3rd parties.”
- Click on the ‘OK’ button to return to the Parameters for Forms 1, 2 and 3 screen or on the ‘Cancel’ button to discard your selections.
- If you want to save your selected parameters, click on ‘Save Defaults’.
- To run the report, click on ‘Print’, ‘Preview’ or ‘to PDF’.
