Accessing the Report
From the Trustee Suite Main Menu toolbar, select ‘Reports’, click on the ‘Case’ tab and select ‘Filtered Timeline’ from the Print Reports screen to invoke the Parameters for Filtered Timeline Report screen (shown below).

Generating the Report
From the Parameters for Filtered Timeline Report screen, select/populate the following fields:
- Sort by: Select either ‘Case No.’ or ‘Case Name’ via the radio buttons.
- Report Title: Enter an appropriate report title (‘Filtered Timeline’ is the default value).
System / Custom Dates and Selected Dates: Select the dates you wish to include in your report from the System / Custom Dates column. Dates may be selected in any of three ways:
1. Left click once on a date description, then click on the Right Arrow, >, button;
-OR-
2. Double click on a date description;
-OR-
3. Click on the Double Right Arrow, >>, to select all of the dates. Up to 15 dates can be selected.
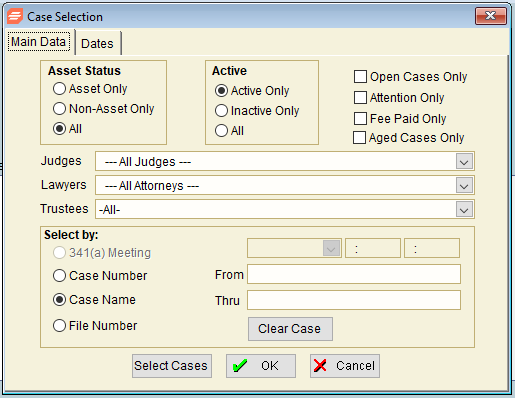
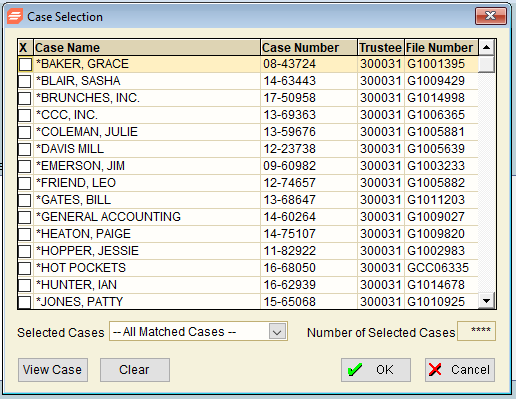
- Select Cases: Selecting this button generates the Case Selection screen as shown below. Select the types of cases to include in the report via the parameters provided. Click on the ‘Clear Case’ button to clear your selections or on the ‘Select Cases’ button, which invokes a second Case Selection screen (shown in the second screenshot below) with a list of cases that match your parameters. Select the case(s) you wish to include in your report by selecting the checkbox(es) to the left of the case names in the “X” column. Click on ‘View Case’ to see individual case information prior to running the report, or clear your selections by clicking on the ‘Clear’ button. Click on ‘OK’ to continue and print or preview the report, or on ‘Cancel’ to undo your selections.


Printing the Report
From the Parameters for Filtered Timeline Report screen, select from the following options:
- Preview: Selecting this button enables you to view before printing.
- Print: Selecting this button sends the report to the default printer.
- To PDF: This button prints the report to PDF and saves a copy to Document Management.
- Cancel: This button undoes any changes and cancels the print job.
- Save Defaults: This button sets the current field selections as the default each time this report is accessed.
