This report is filed for approval to disburse funds.
Accessing the Report
From the Trustee Suite Main Menu toolbar, select ‘Reports’, the ‘UST Forms’ tab and then ‘Trustee’s Final Report (TFR)’ from the Print Reports screen to invoke the Trustee’s Final Report (TFR) screen shown below.
Generating the Report
Top of Screen

Bottom of Screen

- Trustee: Select the Trustee number or -‘All-‘.
- Case: Select the Case number via the drop-down box.
- As Of: Select the ‘As Of’ date (the default is the current date).
- Display Court Case in TFR: Select the ‘Display Court Case in TFR’ checkbox, as necessary.
- File Name: This is an editable field that is pre-populated.
- Include Filter Information: Select this checkbox if you wish to include trustee information to filter.
- Include Judge/Hearing Information: Select this checkbox if you wish to include information regarding the Judge and Hearing.
- Click on the blue ‘Show’ link to display the filter information, which will invoke the following additional information (both the ‘Include Filter Information’ and ‘Include Judge/Hearing Information’ checkboxes have been selected). The yellow fields are editable.
- Include Filter Information:
- Chapter 7 Trustee: 7 is the default but can be modified via the drop-down menu.
- Include Judge/Hearing Information:
- Location: Enter the applicable Hearing location.
- Hearing Date: Enter the applicable Hearing date.
- Hearing Time: Enter the applicable Hearing time.
- Response Date: Enter the applicable Response date.
- Include Filter Information:

- Report Captions & Parameters: Select ‘STANDARD’, ‘FORM B16A (FULL)’ or ‘FORM 16B. (SHORT)’ via the radio buttons.
- Selecting ‘STANDARD’ invokes the following screen. The yellow fields are editable. Enter the DIVISION and, if applicable, you can select the ‘AMENDED TRUSTEE’S FINAL REPORT (TFR)’ checkbox.

- Selecting the ‘FORM B16A (FULL)’ option generates the following screen. The yellow fields are editable. Populate the ‘Employer’s Tax Identification (EIN) No(s).(if any):’ field. As with the ‘STANDARD’ option, you can select the ‘AMENDED TRUSTEE’S FINAL REPORT (TFR)’ checkbox, if applicable.

- Selecting the ‘FORM 16B. (SHORT)’ option invokes the following screen. The yellow field is auto-populated but editable, and again you can select the ‘AMENDED TRUSTEE’S FINAL REPORT (TFR)’ checkbox, if applicable.

- Selecting ‘STANDARD’ invokes the following screen. The yellow fields are editable. Enter the DIVISION and, if applicable, you can select the ‘AMENDED TRUSTEE’S FINAL REPORT (TFR)’ checkbox.
- Report Body Parameters (see the second screenshot from the top of this page):
- In item number 1, Select the applicable chapter (7 is the default).
- In item number 3, Fill in the yellow editable field with the appropriate information.
- In item number 6, the yellow field is auto-populated but can be modified, as applicable.
- Select a report to attach as Exhibit C to the TFR (see the second screenshot from the top of this page):
- Select either:
- ‘Trustee Suite reports’, which provides a drop-down menu of seven Exhibit C reports listed below. If you do not wish to insert an Exhibit C in the TFR, you can simply choose ‘<None>’ from the drop-down.
- Claims Distribution Register
- Claims Proposed Distribution
- Claims Register
- Claims Register – w/o Payments
- Court Claims Register
- Final Distribution
- ‘Trustee Suite reports’, which provides a drop-down menu of seven Exhibit C reports listed below. If you do not wish to insert an Exhibit C in the TFR, you can simply choose ‘<None>’ from the drop-down.
- Select either:
Selecting any of these options enables the ‘Setup Report Parameters’ button. Clicking on this button invokes parameters screens for whichever option you selected from the ‘Trustee Suite reports’ drop-down (e.g., selecting ‘Claims Proposed Distribution’ and then clicking on the ‘Setup Report Parameters’ button generates the Parameters for Claims Proposed Distribution screen, as shown and explained on a different page in this help file.
-OR-
-
-
- ‘an existing PDF’ and select a file from your computer using the Ellipsis icon,
 .
.
- ‘an existing PDF’ and select a file from your computer using the Ellipsis icon,
-
- Report Footer Parameters (see the second screenshot from the top of this page):
- Date: The date will auto-populate to the current date; however, you can change this date, as necessary.
- Include Trustee Bar No.: Select this checkbox if you wish to include the bar number of the trustee.
Printing the Report
- Preview: This button enables you to view the report before printing.
- Print: This button sends the report to the default printer.
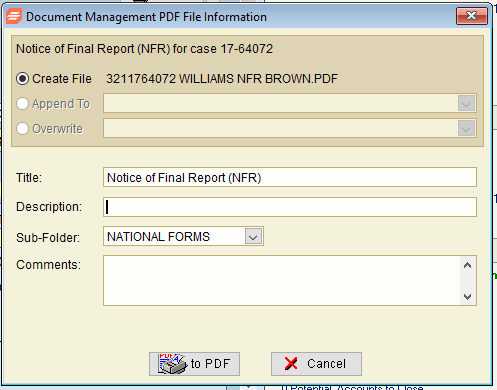
- To PDF: Click on this button to invoke the screen shown below. Add an appropriate description and any applicable comments, if any, and click on the ‘to PDF’ button to save the document to PDF. This will save the report in Document Management.

- Cancel: This button undoes any changes and cancels the print job.
- Options: Selecting the ‘Options’ button generates the following screen with several parameters:

- Customize PDF File Name: Selecting this checkbox enables the text box below and the ‘Sample’ button.
- Include Exemption to Debtor Proposed Amount in Secured List: Select as applicable.
- Include Third Parties in Unsecured List: Select as applicable.
- Suppress Proposed Payments of Zero in Secured List: Selected by default.
- Suppress Proposed Payments of Zero and Disallowed in Unsecured: Selected by default.
- Suppress Proposed Payments of Zero in Admin 7: Selected by default.
- Suppress Proposed Payments of Zero in Admin 11: Select as applicable.
- Select ‘OK’ to implement your selections or ‘Cancel’ to undo them.
